Saturday, August 8, 2009

Some Projects in Progress


Seven necks. I have been working them as a group, because it is more efficient. The eighth is further along in the process, and I use it as a reminder of what is to be done. Depending on how you count them, there are thirty to fifty operations needed before a neck can be attached to the guitar body. These necks are at step fifteen.
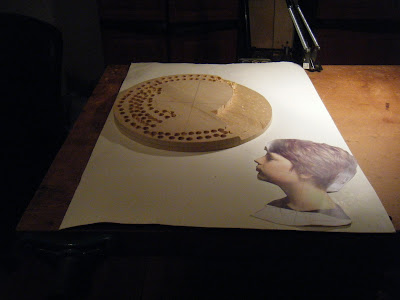


Cameo. A low-relief carving of a head in profile. To the right is the picture from which I work. I am in the process of "raising the field;" that is, cutting away the excess wood over the background. The holes are at a uniform depth, to establish how much should be chiseled off.


Neck Block. This guitar will receive a new neck block. The block shown is the new block, and is about twice the size of the old in. The neck block was replaced to provide enough gluing area to resist the pull of the strings.


Arched Top. The underside of a Sitka Spruce arched top is pictured. I pencil a grid on the surface (the faint lines), and then measure every intersection with a dial gauge. After measuring, I work the thickness down with a round bottom plane, sandpaper, or a scraper. My goal is a uniform thickness of .156.


Resurrection. A guitar I am resurrecting. The body had been completed when humidity changes in the shop caused the thin webs in the sound holes to separate in about eight places. I set it aside back in 2003, and started work on it this year. After taking the back off, , I reinforced the soundhole areas with fine cotton fabric set in epoxy. When the touch-up on the outside is complete, I'll replace the back and complete the guitar.

Sunday, June 7, 2009

Banjo and Cameo

ANTIQUE BANJO

Several months ago I posted some pictures of this banjo as a work in progress. This is the completed instrument. It is not playable, as the neck is warped, but the owner only wanted it in displayable condition.

I changed the neck angle, fabricated a tension ring, and made a new bridge. It has a new head, tensioning bolts, fifth-string peg, and strings.


CAMEO

Here I am working on a Cameo of my granddaughter Julia.

The material is Basswood, three-quarter inch thick and fourteen inches in diameter. I enlarge a profile picture to use as a pattern, and carve the face in low relief. The finish is paste wax, with mahogany colored paste wax to tone the hair to match Julia's red hair.

I did it as a Christmas present for Julia's other set of grandparents, Peggy and Chandler. They liked it enough to ask me to do Jenny and John, their other grandchildren.

Wednesday, February 18, 2009

Letters to Grandchildren

Dear Rose:


This is the "before" picture of your violin. As you can see, it is dirty, and very incomplete. My first step was to send for some basic violin repair tools, and a book on repair. My next step will be to clean it and take it apart, so that it can be re-assembled with fresh hide glue. It will eventually get a new Ebony fretboard, Ebony tailpiece, Ebony tuning pegs, and a Maple bridge. I will keep you posted as the work progresses.

Love, Grandpa

..........................................................


Dear Josh:


Some pictures on the progress of your electric bass. The first picture, with the light color wood, are the blanks for the prototype. The wood is Poplar. I will send the prototype to you, so that you can be sure that I've followed the drawing you agreed to.


The second picture, with the dark wood, is to show the wood I would like to use, if you agree. Both pieces are Honduras Mahogany, but acquired at different times. The piece for the body is a cut-off from wood I bought back in 1986 for furniture. It is plain sawn, and I would be reluctant to use it, but for the fact that it has sat in my shop for twenty-two years without twisting or warping. I think it has proved itself a proper piece of guitar wood. The other piece, for the neck, is quarter sawn, the "holy grail" of guitar makers. I went through all the Mahogany at Woodcraft in Roanoke, and pulled out all the quarter sawn pieces. I paid for them, of course, and then squirreled them away for future guitars.

The Mahogany is a dark red now, and will turn darker with exposure to sunlight. Should you want a darker red, I can accomplish that with a "toner" made of dye in the lacquer finish.

Love, Grandpa

Thursday, February 5, 2009

Promise Guitar


This is the third guitar I started, back around 1980. I had finished a jumbo flat-top, and a large arch-top. I had been well bitten by the guitar bug, and was anxious to move along. I was aware of the shortcomings of my first two, and, as I remember, wanted to back up and work slowly. I had Irving Sloan's "Classical Guitar Construction" and "Steel String Guitar Construction", so I was confident I could overcome any obstacle.

I had joined the sides to the neck, using the traditional Spanish foot, when the obstacle came out of left field. In 1981, I quit my job, and after several frustrating interviews decided to work for myself. I considered franchises, and several other things. I finally decided on woodworking, since I had my Dad's machines and a two-car garage that would serve as a shop. I briefly considered guitarmaking, but realized I had more experience with furniture than guitars.

The incomplete guitar sat on a shelf or hung on the wall in the New Jersey and Virginia shops until around 2002. In the next few years I added the back and top to the sides, and prepared the fretboard. Other guitars have pushed ahead of it in the line, but it is a very patient guitar. It knows the first two guitars are in landfills, so that makes it the living grandfather of everything I have and will build. It has my promise of completion.

Saturday, January 17, 2009

Router Lift

Pic. 1: Router lift, assembled but uninstalled

This project began in the summer of ‘08, and was installed in early ‘09. It is part of the reorganization of my shop that took place when I moved from Virginia to South Carolina. The need to downsize encouraged me to use all the "stuff" I have accumulated, rather than let it continue to clutter my shop. For instance, I’ve cut down my extension ladder to make it into a lumber rack. Plywood I had sized for an abandoned project has morphed into wall-hung cabinets.

For the router lift phase of my “use-it-or-lose-it” project, I’ve re-purposed the following "stuff:"
  • A threaded shaft I trash-picked in 1980, machined for use in a shoulder vise in ‘02 and set aside in ‘06, became the jackscrew that raises and lowers the router.
  • Two shafts that were part of my glass-grinding machinery in the early '80s were turned down by a machinist friend to become the slides on which the router moves.
  • I took apart my Makita three-horsepower router, purchased in 1985, stored the plunge mechanism (for some future project, yet unknown), to make it a dedicated part of the unit.
  • For jackscrew bearings, I used some High Molecular Weight Plastic (aka: slippery plastic) I purchased on a whim in ‘05.
  • For the top plate, I used black phenolic I purchased in 1983 for lighted display cabinets.
  • For the yoke that connects the jackscrew to the router, I used a piece of half inch aluminum, purchased at some undetermined date from Fazzios in South Jersey.

The router lift sits in the plywood top on my table saw. This allows me to use the rip fence as a fence for the router.

It should also be noted that a free-standing router table can cost between $200 and $500. Commercial lift mechanisms are in the same price range. All my accumulated costs probably amount to $150.

Pic. 2: Router lift; installed

This usage clears my shop, and gives me a very nice tool. What more could I ask for?

-----------------------

The guitar body and neck in the background of Picture 2 belong to the second acoustic made by Chan (my son-in-law), in the lacquer finishing process. It is a 000 size, with 12 frets to the body join, and a slotted peghead. The back, sides, and neck are Honduras Mahogany. The top is Spruce, the fretboard and headplate are Madagascar Rosewood, and the soundhole binding is Lacewood. "Let's Hear It For The Boy!"

Friday, January 2, 2009

Antique Banjo

Banjo 1. The rim and head are in the background. The jig is to the right. I'm working on the ring in the foreground.

This banjo was purchased in 1896 by the current owner’s grandfather. It is handmade and homemade, though that is all that is known of its origins.

When I received it for repair, it was without a head, bridge, tension ring, hold-down hooks, or strings. The neck was warped, rendering the instrument unplayable.

Repairs were mainly cosmetic, as the banjo would be used only for historic display.

The hooks, head, bridge, and strings were readily available, but the appropriate tension ring was not. I handmade a tension ring by first using a lathe to turn a forming jig of the correct size and then laminating the ring using Hard Maple veneer and epoxy.

The ring was then ready to be beveled (to properly engage the hooks), painted, and the banjo re-assembled.

This is one of those pieces that are a rare pleasure to repair because of its history (known and unknown). Every element that my hand touches has a story. There are few things I enjoy more than imagining what those stories might be.

Banjo 2. The ring on the rim of the banjo’s head.